
DIY Fabric Wall Decals (Spring and Easter Fun)
")
I love this tutorial for DIY Fabric Wall Decals (Spring and Easter Fun). It is a fun spring/Easter DIY project idea. It really could be modified to be used all year round!
Spring Wall Fabric Decals:
Supplies:
Fabric of your choice
Steam A Seam (I found it at Hobby Lobby for $4.99 for 5 sheets, I only used 1 for this project)
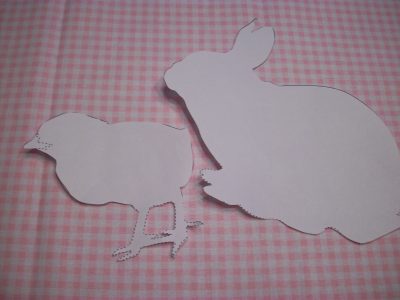
Printables of your choice (click here for the bunny and chick)
Sharp scissors
Iron
Pencil
")
Step 1: Print your image of choice. I’m using Martha Stewart’s clip art from her website
")
Step 2: Cut out image
")
Step 3. (It is helpful to also follow the directions on the Steam A Seam package) Retrace your image onto the paper lining those sticks to the Steam A Seam. There is another sheet that will come away easily, you do not want to trace on that sheet.
")
Step 4: Once your image is traced remove the sheet that falls away easily from the adhesive. Place the adhesive side on the reverse side of your fabric. If it doesn’t stick, you may want to lightly iron the fabric and replace the adhesive side of your image again.
")
Step 5. Carefully cut out your image and fabric. I recommend using fabric scissors.
Step 6: Once your image is totally cut out, carefully peel the protective sheet from the fabric.
")
Step 7: Position your decal on the wall. It will be sticky enough that you can try re-position the decal if you need to before ironing it on the wall.
Step 8: Carefully iron the decal on the wall to adhere. The decal is removable after ironing but may lose its adhesive if you try and re-iron it back on the wall.
Imagine the possibilities with any image and any fabric of your choice!! Spring Wall Fabric Decals are a fun spring or Easter DIY project idea. It could be modified for all year round!
Easter Posts You May Enjoy:
Easter Card – Thumbunny Loves You

Melissa is a football and soccer mom who has been married to her best friend for 24 years. She loves sharing recipes, travel reviews and tips that focus on helping busy families make memories.


Hand made decals 🙂 pretty cool!!!
Wow! Such a lovely idea!!! I will try to make this one also.