Gluten Free Casein Free Twinkies
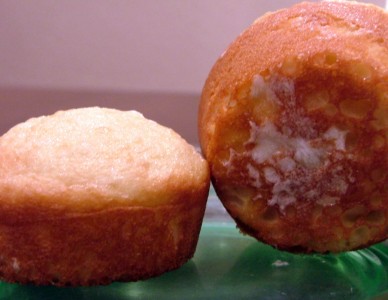
We had a reader request for Gluten Free Casein Free Twinkies. We hope that this recipe fits the bill! It is so delicious! I mean does it get any better than a homemade twinkie? It does when it is both gluten free and dairy free!
This Gluten Free Casein Free Twinkies recipe is a healthy copycat version. Also much healthier than the “traditional” store bought hostess twinkie too! Once you give it a try you are certain to never go back! We hope you enjoy it as much as we did!
Gluten-Free, Casein-Free "Twinkies"
Ingredients
- 1 1/2 cups Better Batter all-purpose flour*
- 4 Tbsp gluten-free corn starch
- 1 1/2 cups white sugar
- 1 Tbsp baking powder
- 1 tsp salt
- 1/2 cup coconut oil
- 3/4 cup cold water
- 1 tsp vanilla extract
- 7 large eggs separated
- Cooking Spray
- 2 Tbsp Better Batter all-purpose flour*
- 1/2 cup milk substitute I used almond milk, plain
- 1/2 tsp vanilla extract
- 1/2 cup organic vegetable shortening
- 1/2 cup white sugar
Instructions
- Preheat oven to 350 degrees. Spray muffin tins (or a canoe pan) with cooking spray and set aside.
- Using an electric mixer, beat egg whites until they are very stiff. They should hold their shape when removed from the bowl. Set aside.
- Combine the Better Batter all-purpose flour, corn starch, sugar, baking powder, and salt in a large bowl. Whisk together or beat on low speed for a minute, until combined.
- Add oil, water, vanilla extract, and egg yolks. Beat on medium speed until smooth.
- Using a spatula, gently scoop 1/3 of the egg whites into the batter. Mix on low speed until combined. Repeat with the other two thirds of egg whites.
- Spoon the batter into the pan(s), filling the wells about 2/3 full.
- Bake for about 13-15 minutes or until cakes are golden brown and starting to pull away from the sides of the pan. (Cakes will puff up when cooking, but will settle down as they cool.)
- Cool the cakes in the pan for 5 minutes, then gently remove from the pan using a dull knife around the edges to slide them out of the pan.
- Allow cakes to cool, flat side down, directly on the cooling rack.
- To make the filling: heat the 2 Tbsp flour and almond milk in a small saucepan over medium heat, stirring constantly.
- When the mixture becomes a paste, about 5 minutes, remove from heat and allow to cool for 1 minute. Stir in the vanilla extract.
- Place a piece of plastic wrap directly onto the surface to prevent a skin from forming and set aside to cool completely.
- With an electric mixer, cream the shortening and sugar until light and fluffy. Add the cooled milk mixture and beat for about 5 minutes, until smooth and creamy.
- Use a pastry bag with a round tip to fill the cakes. Place the tip about halfway into the bottom of the cake and squeeze gently. (You can see the cake plump up when it's full.)
Notes
Gluten Free Dessert Recipes:
Fresh Blueberry Sauce/Topping Recipe
GF and Dairy Free German Chocolate Cake
GF Brownie Ganache Torte with Raspberries
Gluten Free Chocolate Citrus Bars
Gluten Free Irish Creme Brulee
Most Popular GF Tips:
Gluten Free Menu at Cracker Barrel
The Best Gluten Free Food at Walt Disney World
Best Gluten Free Food at Universal Studios Orlando
Can you eat gluten free on a Disney Cruise?
50 Stocking Stuffer Ideas for Gluten Free Friends
Stockpiling Moms can be found in all your favorite places. Hop on over to Instagram and follow the fun. We love posting memes, family fun, travel, and whatever we are feeling that day. Pinterest is also an amazing place to visit Stockpiling Moms. This is where you can pin all your favorite articles from our Food, Travel & Lifestyle Blog.
Rachel is the mother of a son with Autism. She and her family began eating a gluten-free, casein-free diet in November 2011. Not long after, she discovered that she too was intolerant of gluten and has happily enjoyed discovering new ways to find delicious ways to enjoy eating a gfcf diet. Please visit her blog to learn more.


