
DIY Pumpkin Face Mask

I am in love with this DIY Pumpkin Face Mask. Shelley knows I love all natural face masks and she found this and sent it to me. Of course, I adapted it a bit. The natural ingredients are great for your skin. This natural face mask is so much better than store bought products because it is all natural. All you need is 5 ingredients that you most likely have in your pantry to make it. It doesn’t have a long shelf life though, so it is best to make a small quantity.
To prepare simply combine the Pumpkin, Nutmeg and Cinnamon in a bowl. Add Honey and Olive Oil Blend together and then apply to your face (add more honey if you need consistency to be stickier). Allow it to sit on your face for 15 minutes and then rinse with warm water and a washcloth. Or if you are like me just hop in the shower and let it go down the drain. That is, it! If you are hosting a spa night this fall at your house for Girls Night In this is a nice make and take. Everyone can make it up and then take it home to use. If you have excess be sure to store in the refrigerator.
DIY Pumpkin Face Mask:
- Nutmeg is anti-inflammatory and helps reduce pore size and acne scars.
- Pumpkin is packed full of vitamins including Vitamin A, C and E. It will reduce damage caused by free radicals, fight acne and hydrate your skin.
- Olive Oil is a natural moisturizer.
- Honey is anti-fungal and helps cleanse your pores. Local honey is proven to help if you have allergies against pollen. Sometimes skin problems like puffiness or redness are from pollen allergies.
- Cinnamon is an antiseptic and works well at combating acne and cleansing your pores.
DIY Pumpkin Face Mask
Print Recipe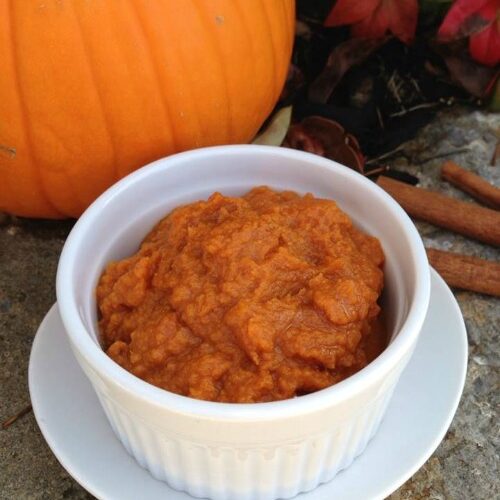
Ingredients
- 1/2 cup Pumpkin fresh or canned
- 1 TBSP Olive Oil
- 1 tsp Nutmeg
- 1 TBSP Honey
- 1 tsp Cinnamon
Instructions
- Combine Pumpkin, Nutmeg and Cinnamon in a bowl.
- Add Honey and Olive Oil
- Blend together and then apply to your face (add more honey if you need consistency to be stickier)
- Allow it to sit on your face for 15 minutes and then rinse with warm water and a washcloth. Or if you are like me just hop in the shower and let it go down the drain.
Posts You May Enjoy:
10 Honey Recipes & DIY Remedies
10 Simple Steps to Lower Your Cholesterol
8 Foods That Help Fight Cellulite

Melissa is a football and soccer mom who has been married to her best friend for 24 years. She loves sharing recipes, travel reviews and tips that focus on helping busy families make memories.

Should I boil the pumpkin first, it might be too hard to combine
You use canned pumpkin or if you want to make your own pumpkin puree you can.
https://www.stockpilingmoms.com/2012/11/homemade-pumpkin-puree/
my friend gave me and some other gals this for Valentines day and we all loved it.
Why is my face red after use?
How long of a shelf life does this recipe have in the fridge?
Thanks!!
I would say 5-7 days max.